In this post, we’ll learn about the AWS SDK for .NET and how to get started, using it to building .NET Core applications. There are many topics introduced in this post which lay some foundational knowledge that you will find useful as you get started developing .NET applications for AWS.
A complete sample application can be found in my ‘aws-samples’ GitHub repro.
What is the AWS SDK?
The AWS SDK provides libraries for programmatically managing and consuming AWS services and resources. The SDK libraries are available via Nuget as several packages, each relating to specific AWS services.
AWS can be accessed using a variety of tools such as the AWS Console or the AWS CLI experience. When we need to work with AWS from .NET Code, the SDK is available, allowing us to use C# to control and interact with AWS resources.
Securing AWS Requests With IAM
All requests to AWS must be secured to ensure that the application or user making requests is authenticated and authorised to access the AWS account, service and resource which they are attempting to act upon. I won’t attempt to cover all of the complexities of AWS security and the Identity and Access Management (IAM) service in this post. What I will do, is provide enough of a foundation to help you to understand enough to get started with using AWS from .NET applications.
Security in AWS begins with the Identity and Access Management (IAM) service. People and applications are defined in this service as “principals” which may then be granted permissions within an AWS account. A principal may be a real person, such as a developer user, or it may be an application that is operating with AWS services.
For this post, we’ll focus on creating a user. When you first create an AWS account, you’ll provide the email address and password for a root user. This is your super admin user which has the power and access to do anything within the AWS account. Because this account has powerful access, it’s not recommended to use it for day-to-day activities within AWS. You’ll want to create one or more users in IAM that define specific access permissions.
For this example, we’ll create a user that we can use when developing an application locally. Let’s create a user with no access permissions. This sounds pretty useless, and in some respects, it is! We’ll be applying a least privilege approach for the access permissions, applying only those permissions which are needed, when they are needed. We’ll do this via the AWS Console which includes a web-based GUI for managing AWS. As you become more proficient with AWS, you’ll likely want to do less in the console, and use more repeatable approaches to configuring AWS services. You may use the AWS CLI or AWS Tool for PowerShell to script your commands. You may also want to investigate CloudFormation, which is my preferred approach for defining and updating AWS services with an infrastructure-as-code approach. The use of CloudFormation templates help define the services you need so that they can be reliably and repeatedly created and deployed into any environment.
Creating a User in AWS IAM
Identity and Access Management (IAM) is a free service in AWS which supports the management of security for your account. We’ll use this service to define a user with limited access permissions that we can use during local development to connect to AWS services.
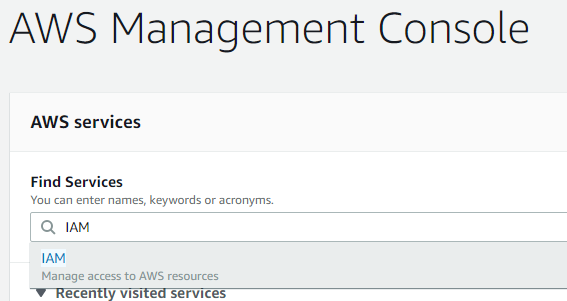
After logging into AWS, you can access various services using the “Find Services” search bar. Type IAM, to find the Identity and Access Management service.
Once you click on this service link, the IAM dashboard loads, providing a summary of the IAM resources for the current AWS account.
From the menu, you can choose “Users” to view and manage user principles. Since we’re creating a new user, we can use the “Add User” button to begin that process. This button opens the Add user wizard.
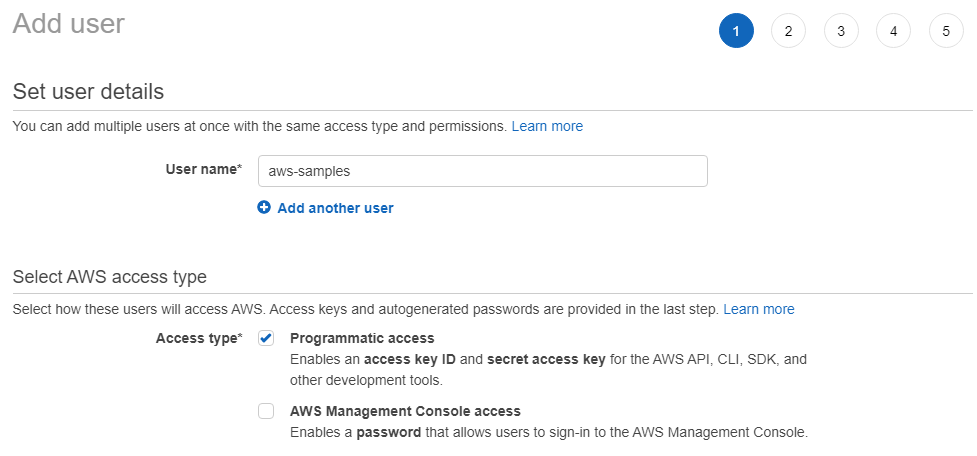
We can provide a unique name for the user principle. I’ve used “aws-samples” for my user name in the screenshot above.
We must also select the access type or types for this user. I’ve selected programmatic access as this user will be used by me during .NET application development. You’ll need to select this type if you plan to use the user for programatic and terminal access from most of the AWS development tools.
The second access type, which I’m not using in this example, is “AWS Management Console access”. When this type is chosen, an AWS console password will be enabled so that the user can log into the web console for AWS. This gives us fine-grained control over our user and how they can interact with and operate upon AWS.
We won’t set any permissions for the user in this post so the next few steps in the user creation wizard can be skipped through with no changes being applied.
In the final step, we’ll see something very important.
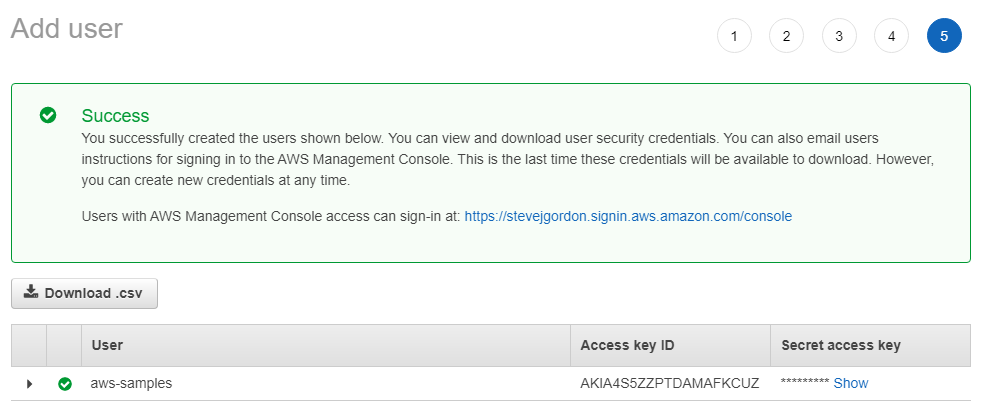
Because we selected the “Programmatic access” option, an Access Key ID and Secret Access Key have been created. We’ll see how to use these with the .NET SDK and AWS Tools for Visual Studio a little later on. It’s essential to keep these keys very secure since anyone who has access to them, will be able to programmatically perform actions against any services to which this user principle is later authorised.
The Access Key ID is always accessible from the AWS Console, but the secret is only accessible at the time when the key is first created. Once you move past this screen, you will no longer be able to retrieve the secret, so you must grab it before you move on. An IAM user can be assigned up to two access keys at any one time. If you wish to remove a key or should you lose your secret, you can delete the key and create a new key ID and secret using the IAM area of the AWS Console. Once deleted, all programmatic access using that key will be denied.
For now, though, we’ll need the credentials to set up the local development environment so let’s click the “Download .csv” button. Be aware that this will include the keys in plain text so you should ensure that this file is secured and accessed appropriately. After you have used the file to set your local credentials, it’s important to remember to delete it securely to avoid it falling into the wrong hands. Anyone with these credentials will be able to perform any operations on services to which the IAM user is granted permissions. Once this file is downloaded, we have everything we need to begin developing against AWS locally.
Applying the AWS Credentials Locally
With the credentials downloaded, they will need to be registered so that the AWS CLI and SDK can access them when needed. There are various locations which get checked for credentials by these tools, so you have several options to apply them to your local development machine. As we’ll see, some locations are limited to a subset of the AWS management tools.
For SDK and CLI development, one option is to define two environment variables which will be checked for the credentials. To do this, you will add an AWS_ACCESS_KEY_ID environment variable with the value as displayed in the AWS Console, or from the credentials.csv file. You will then need to add the environment variable named AWS_SECRET_KEY and populate this with the value available in the console when you first create an IAM user, or from the downloaded credentials file.
If you plan to use Visual Studio for your development of your .NET application, there is another, more straightforward approach you can use. AWS provides a Visual Studio extension, available in the marketplace, called “AWS Toolkit for Visual Studio”. This extension supports both VS 2017 and VS 2019.
If you add this extension to Visual Studio, it provides quick access to many features, as well as including some additional templates for AWS focused projects. For the most part, its capabilities are beyond the scope of this blog post. I won’t cover the installation of the AWS Toolkit as it’s pretty straightforward. The AWS documentation provides details of the pre-requisites and installation steps.
Registering Credentials with the SDK Store
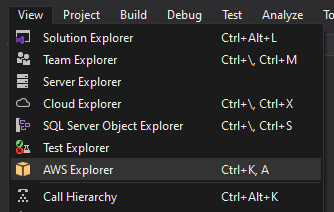
Let’s focus briefly on using the AWS Toolkit to register some credentials. To load the AWS Explorer, choose View > AWS Explorer from the Visual Studio menu.
A new account profile window opens where we can create profiles. The AWS tooling supports registering multiple profiles with different logical names so that different applications in development can choose a specific profile from which to load the credentials. This is important as you ideally want to define different IAM Users and profiles for each application, limiting the permissions to only those they explicitly need. It’s tempting to use a single user and profile with a combined set of permissions, but we then breach least privilege principle. If the credentials for that user are compromised, many more services may be exposed.
Aside: When it comes to actual deployment, you’ll likely not use IAM users, but IAM roles which can also be granted permissions to perform actions within AWS. You then assign your deployed application to a role, again with least privilege permissions. Mirroring this concept in development get’s you used to limiting the access to just the functionality your application code needs.
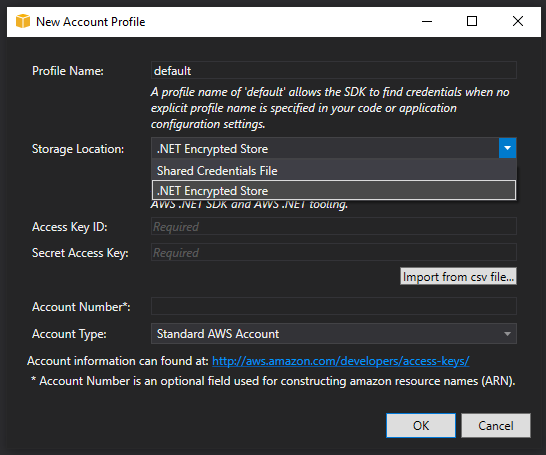
In the preceding screenshot, you can see the “New Account Profile” window. The SDK, by default, looks for an account named default, so we’ll add a profile with that name for this example.
The storage location provides two options and the choice impacts where you can use the credentials. The default option is to add the credentials to the Shared Credentials File. On Windows, by default, this is located at C:\Users\<username>\.aws\credentials. Because this is saved in your Users folder, the credentials are only accessible when you are logged into the PC. Other users have their own file and need to add their own credentials. The Access Key Id and the Secret Access Key are stored in this file in unencrypted form. An advantage of using this store is that it’s also available to other AWS tools, such as the AWS CLI. You can also added profiles to this file without the need to install and use the AWS Toolkit.
The second option, the .NET Encrypted Store, is an alternative storage location which is supported only from the .NET SDK and the AWS Toolkit for Powershell. When using this option, which we will for this example, the credentials are stored in a file named RegisteredAccounts.json in C:\Users\<username>\AppData\Local\AWSToolkit. While the usage of this file is more limited, and can’t be read by the AWS CLI for example, it has a nice benefit that the contents are encrypted. The AWS SDK for .NET checks for a profile named default in this file and use that unless a different profile name is specified. This limits the configuration you must manually provide in your application.
We’ll select the .NET Encrypted Store option and then provide the Access Key ID and Secret Access Key for the profile. You can copy these manually from the console, or you can import the values from the Credentials.csv file we downloaded earlier. Once imported, we can click OK to create the profile.
Aside: The approach I’ve shown for creating a user and registering credentials is a valid way to work with AWS in development, but there are many nuances and approaches you will likely navigate towards as you become more familiar with AWS and IAM. A more secure option you may want to work towards is using temporary credentials for access by assuming roles for an AWS user with limited access permissions by default.
Getting Started With the AWS SDK
Before we make use of the AWS credentials we downloaded, we’ll first create a simple .NET Core application which interacts with AWS. In my experience, you may want to call AWS services with web APIs, GUI web applications or from worker services. It may very well be all three if you are developing using a microservices architecture. We could, of course, start with a basic console application for this sample, but I feel that’s not entirely realistic as an example of building a .NET Core microservice; so instead, we’ll use a new template available since .NET Core 3.0 called “Worker Service”.
A Worker is simply a non-interactive service which runs, usually perpetually and performs some long-running processing workload. A typical case where I use such services is for processing messages from a queue in the managed AWS Simple Queue Service.
You can create a worker service project from Visual Studio, or via the .NET CLI.
Let’s use the CLI for this example. In a suitable directory we’ll run the following command:
dotnet new worker -n "GettingStarted"
This creates a new worker service project named “GettingStarted” within the current directory.
Next, navigate into the newly created GettingStarted directory.
From this directory, we can add the first NuGet package we need to support using the AWS SDK with .NET Core and ASP.NET Core applications.
Let’s add the package using:
dotnet add package AWSSDK.Extensions.NETCore.Setup
With the package now referenced, let’s open the project in your preferred IDE or editor.
The AWS extensions provide methods we can use to nicely integrate the SDK with the built-in dependency injection container, configuration and options libraries which are part of the core features in ASP.NET Core application and .NET Core Worker Services.
When accessing AWS services, many different regions are available where your AWS services can be created. As a result, we need to provide some configuration which the SDK reads to determine which region it communicates with by default.
The NETCore.Setup package we have just installed supports using the standard hierarchy of configuration sources that are available for .NET Core applications. Therefore, we can add our config to the appsettings.json file.
The above code adds a configuration section named AWS with a configuration setting named Region. The region setting is where we provide the AWS region we want the SDK to use. I’m in the UK, so I’ve chosen to use a region geographically close to where I live, for the least latency. There are other configuration values we can provide via configuration, but we don’t need those for this basic sample.
With the configuration now available, our next job is to tell the AWS SDK that it should attempt to load it. To do that, we’ll use an extension method on the IServiceCollection which is included in the AWSSDK.Extensions.NETCore.Setup library.
The preceding code calls the AddDefaultAWSOptions extension method. It passes an instance of AwsOptions as an argument. To get the AwsOptions instance, the IConfiguration extension method “GetAWSOptions” is used, which creates the AwsOptions populated with data available in the .NET Core configuration for this application. In our case, this has read the AWS section and loaded the region value.
At this point, we have the .NET Core helper library for the SDK installed and the configuration loaded. Technically, we’re done, and you’re ready to move onto using one of the service-specific SDK libraries to start working with AWS services. Perhaps we should briefly see what that looks like, before wrapping up!
Let’s install another AWS SDK library, this time, we’ll choose the AWSSDK.S3 package, which supports working with Amazons Simple Storage Service. Don’t worry if you don’t know about this service right now. We’re not going to interact with it in this post. In short, AWS S3 is an object store for blobs of data you wish to store and retrieve.
We can install the S3 SDK package from the NuGet package manager, or via the command line.
dotnet add package AWSSDK.S3
At this point, your project file should look something like the snippet below. Note, the versions you pull down are likely to be slightly newer by the time you read this post.
We now have the AWSSDK extensions package referenced as well as the AWSSDK S3 package we have just installed.
Before using any of the service-specific packages for AWS, we can also register them with the dependency injection container. This allows our code to depend on the interfaces defined for those libraries, which can then be injected into any classes where they are needed via dependency injection.
Line 6 adds a call to AddAWSService, which accepts the service interface we which to include. In this case, we’ll register IAmazonS3, which is defined in the AWSSDK.S3 library. This extension method knows how to locate and register all required services into the container to support using the S3 library across our code.
We’re nearly done now! We can, if you prefer, simplify this code slightly. In earlier versions of the SDK from AWS, the call to AddDefaultAwsOptions was required to ensure settings like the region were loaded correctly. Today, the SDK has behaves differently, and the ClientFactory which is responsible for creating the service clients (the implementation of IAmazonS3 in this case) checks whether the AwsOptions is registered in the DI container. If not, it attempts to create an instance of the options using the GetAWSOptions option, before creating the required SDK client.
Therefore, it’s possible to remove the call to AddDefaultAWSOptions in ConfigureServices,
Be aware though that the way the SDK is designed today when the AddDefaultAWSOptions method isn’t called an instance of AwsOptions won’t be registered with the dependency injection container. Therefore, the client factory must create an AwsOptions instance for each SDK client (AWS service) you are using in your application. For most applications this won’t be a huge issue but if you are looking to gain every byte of memory back, you probably want to share the AwsOptions by ensuring it’s loaded once and stored in the DI container.
Summary
This post has been a lengthy one, which I hope serves as a useful introduction to some AWS concepts that .NET developers should be aware of. We learned that the AWS SDK provides .NET libraries for interacting with AWS services. We learned how to use the Identity and Access Management service to create a user with limited privileges and how to generate keys to be used by the SDK during development. We installed the AWS toolkit to create a profile on a development PC which stored the AWS credentials. We then created a .NET Core Worker Service project and added the .NET extensions library from the AWS SDK which supports integration with the Microsoft dependency injection container and the configuration and options libraries. Finally, we explored registering the AWS services into the Worker Service.
We ended the post there since the next steps require exploring individual AWS services. Check back in, or sign up to my mailing list on the right-hand side, for more AWS and .NET posts.
Please, take a moment to follow me on Twitter for updates when I post and for other useful content for .NET developers.
Have you enjoyed this post and found it useful? If so, please consider supporting me: