As I’ve covered a few times previously in my blog I’m really enjoying working on the allReady project which is run by the Humanitarian Toolbox non-profit organisation. One of the great things about this project from a personal perspective is the chance to learn and develop my skills, whilst also contributing to a good cause.
Recently I picked up an issue which was not in my normal comfort zone, where the requirement was to load a Bing map showing a number of pins relating to request data coming from our MVC view model. I’m not very experienced with JavaScript and tend to avoid it whenever possible, but in this case I did need to use it to take data from my ASP.NET Core model to then populate the Bing maps SDK. As part of the requirement we needed to colour code the pins based on the status of the request.
My starting point was to have a look at the SDK documentation available at http://www.bing.com/api/maps/mapcontrol/isdk. After a bit of reading it looked possible to meet the requirement using the v8 SDK.
The first step we to update our Razor view page to include a div where we wanted to display the map. In our case I had decided to include a full width map at the bottom of the page so my containing div was as follows:
<div id="myMap" style="position:relative;width:100%;height:500px;"></div>
The next step was to include some JavaScript on the page to use the data from our view model to build up the pushpin locations to display on the map. Some of the existing map logic we have on the allReady project is stored inside a site.js file. This means we don’t need to include too much inline code on the page itself In my case the final code was as follows:
@section scripts {
    <script type='text/javascript'
            src='https://www.bing.com/api/maps/mapcontrol?callback=GetMap'
            async defer></script>
    <script type='text/javascript'>
        function GetMap() {
            renderRequestsMap("myMap", getLocationsFromModelRequests());
        };

        function getLocationsFromModelRequests() {
            var requestData = [];
            @foreach (var request in Model.Requests){
                @:var reqData = {lat:@request.Latitude, long:@request.Longitude, name:'@request.Name', color:'blue'};

                if (request.Status == RequestStatus.Completed)
                {
                    @:reqData.color = 'green';
                            }

                if (request.Status == RequestStatus.Canceled)
                {
                    @:reqData.color = 'red';
                }

                @:requestData.push(reqData);
                        }
            return requestData;
        }
    </script>
}
This renders two script blocks inside our master _layout page’s scripts section which is rendered at the bottom of the page body. The first script block simply brings in the Bing map code. The second block builds up the data to pass to our renderRequestsMap function in our site.js code (which we’ll look at later).
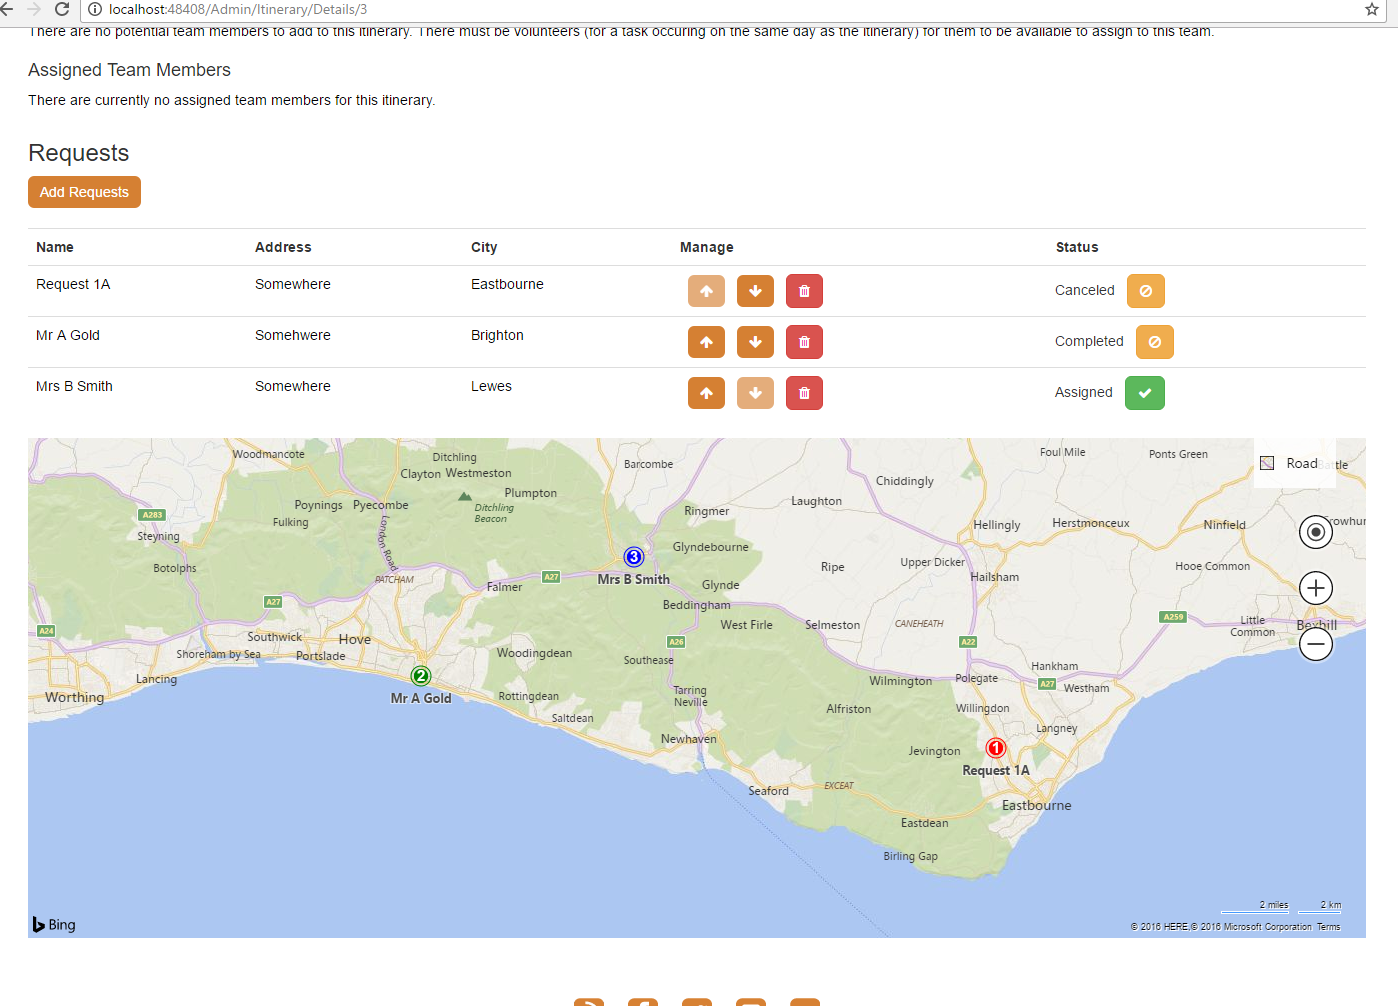
The main function here is my getLocationsFromModelRequests code which creates an empty array to hold our requestData. I loop over the requests in our MVC view model and first load the latitude and longitude information into a JavaScript reqData object. We set a name which will be displayed under the pin using the name of the request from our Model. We also set the color on this object to blue which will be our default colour for pending requests when we draw our map.
I then update the color property for our two other possible request statuses. Green for completed requests and red for cancelled requests. With the object now complete we push it into the requestData array. This forms the data object we need to pass into our renderRequestsMap function in our site.js.
The relevant portions of the site.js that result in producing a final map are as follows:
var BingMapKey = "ENTER_YOUR_KEY_HERE";

var renderRequestsMap = function(divIdForMap, requestData) {
    if (requestData) {
        var bingMap = createBingMap(divIdForMap);
        addRequestPins(bingMap, requestData);
    }
}

function createBingMap(divIdForMap) {
    return new Microsoft.Maps.Map(
        document.getElementById(divIdForMap), {
        credentials: BingMapKey
    });
}

function addRequestPins(bingMap, requestData) {
    var locations = [];
    $.each(requestData, function (index, data) {
        var location = new Microsoft.Maps.Location(data.lat, data.long);
        locations.push(location);
        var order = index + 1;
        var pin = new Microsoft.Maps.Pushpin(location, { title: data.name, color: data.color, text: order.toString() });
        bingMap.entities.push(pin);
    });
    var rect = Microsoft.Maps.LocationRect.fromLocations(locations);
    bingMap.setView({ bounds: rect, padding: 80 });
}
The renderRequestsMap function takes in the id of the containing div for the map and then our requestData array we built up in our Razor view. First it calls a small helper function which creates a bing map object targeting our supplied div id. We then pass the map object and the request data into addRequestPins.
addRequestPins creates an array to hold the location data which we build up by looping over each item in our request data. We create a Microsoft.Maps.Location object using the latitude and longitude and add that to the array (we’ll use this later). We then create a Microsoft.Maps.Pushpin which takes the location object and then a pushpin options object. In the options we define the title for the pin and the color. We also set the text for the pin to a numeric value which increments for each pin we’re adding. That way each pin has a number which corresponds to its position in our list of requests. With all of the pushPin data populated we can push the pin into the map’s entities array.
Once we’ve added all of the pins the final step is to define the view for the map so that it centers on and displays all of the pins we have added. I’ve achieved that here by defining a rectangle using the Microsoft.Maps.LocationRect.fromLocations helper function. We can then call setView on the map object, passing in that rectangle as the bounds value. We also include a padding value to ensure there is a little extra space around the outlying pins.
With these few sections of JavaScript code when we load our page the map is displayed with pins corresponding to the location of our requests. Here is what the final map looks like within our allReady application.
Have you enjoyed this post and found it useful? If so, please consider supporting me:
One thought to “Loading Pin on Bing Maps from ASP.NET Core MVC Data”