In part 3 I discussed one of the first motivations which led our team to begin using Docker. That motivation was focused on making the workflow for our front end developers quicker and simpler. In this post I want to explore a second motivation which led to us fully embrace Docker on our project. Just like part 3, this post doesn’t have any code samples; sorry! Instead I want to share the thought process and concepts from the next phase of our journey without going too technical. I believe this will give the next parts in this series a better context.
Why deploy with Docker?
Once we had Docker in place and we were reaping the benefits locally, we started to think about the options we might have to use Docker further along our development lifecycle, specifically for build and deployment.
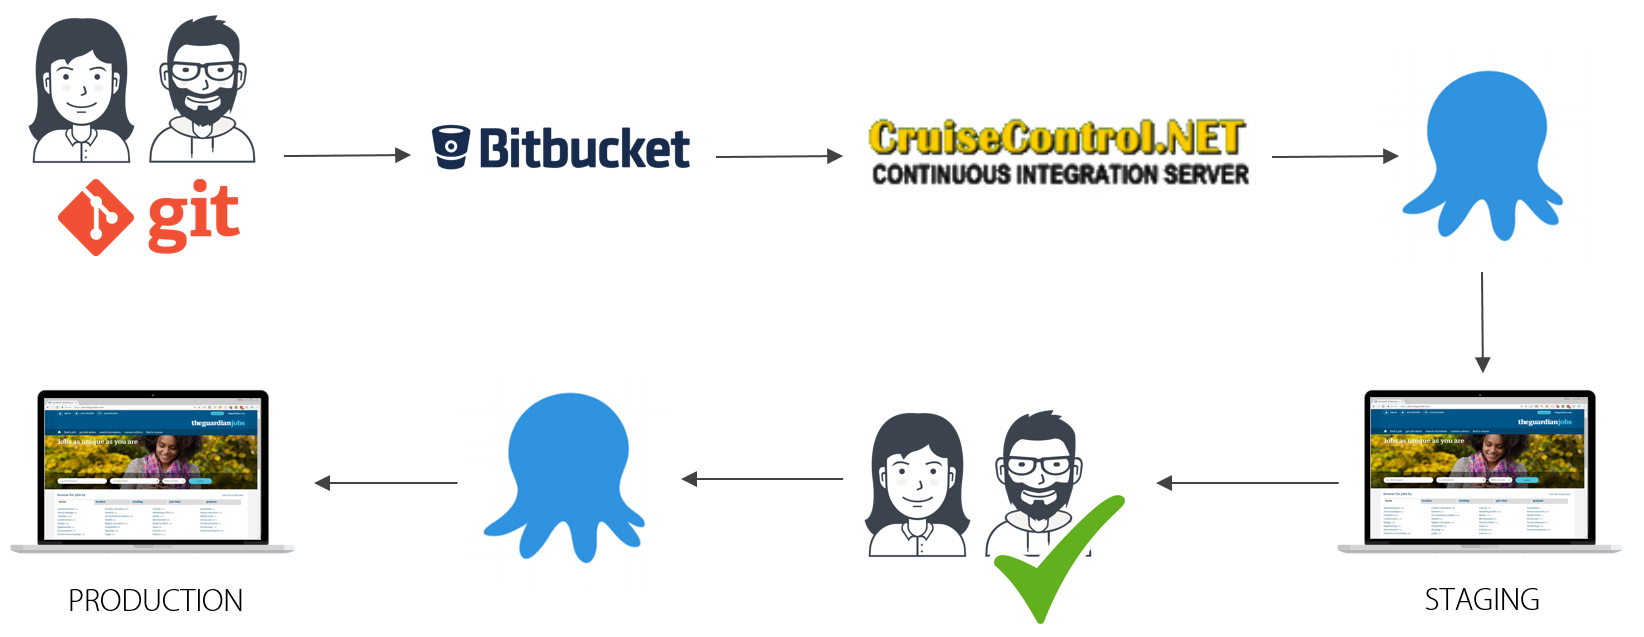
Our current job board platform follows continuous delivery. Every time a developer checks in, the new code is picked up by the build system and a build is triggered. After a few minutes the code will have been built and all tests run. This helps to validate that the changes have not broken any existing functionality.
Deployments are then managed via Octopus deploy which will take the built code and deploy it onto the various environments we have. Code will be deployed onto staging and within that environment our developers have a chance to do some final checking that the new functionality is working as expected. Our testing team have the opportunity to run regression testing against the site to validate that no functionality has been broken. Once the testing is complete, the code is triggered for deployment onto our production environment. This is a manual, gated step which prevents code releasing without a developer or developers validating it first.
That flow looks like this:
With our new project we agreed that ideally we wanted to get to a continuous deployment flow, where code is checked in, tested and deployed straight to live. That sounds risky I know and was something we weighed up carefully. A requirement of this approach is that we can fail fast and rapidly deploy a fix or even switch back to a prior version should the situation require it (we can get a fix to live in about ~5 minutes). By building in smaller discrete microservices we knew we would be reducing the complexity of each part of the system and could more easily test them. We are still working out some additional checks and controls that we expect to implement to further help prevent errors slipping out to live.
At the moment this involves many unit tests and some integration tests within the solutions using the TestHost and TestServer which are part of ASP.NET Core. I’m starting to think about how we could leverage Docker in our build pipeline to layer in additional integration testing across a larger part of the system. In principle we could spin up a part of the system automatically and then trigger endpoints to validate that we get the expected response. This goes a step further than the current testing as it tests a set of components working together, rather than in isolation.
One of the advantages that Docker provides is simplified and consistent deployments. With Docker, your create your images and these then become your unit of deployment. You can push your images to a container registry and then deploy that image to any Docker host you want. Because your image contains your application and all of its dependencies you can be confident that once deployed, your application will behave in the same way as it did locally.
Also, by using Docker to run your applications and services, you no longer need to maintain dependencies on your production hosts. As long at the hosts are running Docker, there are no other dependencies to install. This also avoids conflicts arising between applications running on the same host system. In a traditional architecture, if a team wants to deploy an application on the same host, requiring a newer version of a shared dependency, you may not be able to upgrade the host without introducing risk to the existing application.
Using Docker for Builds
In prior posts we’ve seen that we can use the aspnetcore-build image from Microsoft to perform builds of our source code into a final DLL. This opens the door to standardise the build process as well. We now use this flow for our builds, with our Jenkins build server being used purely to trigger the builds inside Docker. This brings similar benefits as I described for the production hosts. The build server does not need to have the ASP.NET Core SDK installed and maintained. Instead, we just need Docker and then can use appropriate build images to start our builds on top of all of the required dependencies. Using this approach we can benefit from reliable repeatability. We don’t have to worry about an upgrade on the build server changing how a build behaves. We can build applications that are targeting different ASP.NET Core versions by basing them on a build image that contains the correct SDK version.
Some may raise a question over what the difference is between Docker and Octopus or Docker vs Jenkins. They all have overlapping concerns but Docker allows us to combine the build process and deployment process using a single technology. Jenkins in our system triggers builds inside Docker images and we then ship the built image up to a private container registry (we use Amazon ECR which I’ll look at soon).
Octopus is a deployment tool, it expects to take built components and then handles shipping them and any required configuration onto deployment targets. With Docker, we ship the complete application, including dependencies and configuration inside the immutable Docker image. These images can be pulled and re-used on any host as required.
Why Jenkins?
In our case there was no particular driver to use Jenkins. We already had access to Jenkins running on a Linux VM within our internal network and saw no reason to try out a new build server. We asked our systems team to install Docker and we then had everything we needed to use this box to trigger builds. In future posts I’ll demonstrate our build scripts and process. I’m sure that most of the steps will translate to many other common build systems.
Hosting with AWS
A final decision that we had to make was around how we would host Docker in production. At the time our project began we were already completing a migration of all of our services into AWS. As a result, it was clear that our final solution would be AWS based. We had a look at the options and found that AWS offered a container service which is called Amazon ECS.
The options for orchestrating Docker are a little daunting, and at this time I haven’t explored alternative solutions such as DC/OS or Kubernetes. I’ve not personally explored them at this stage. Like Amazon ECS they are container orchestration services that schedule containers to run and maintain the required state of the system. They include things like container discovery to allow us to address and access the services we need. Amazon ECS is a managed service that abstracts away some of the complexities of setting these systems up and managing them. However, this abstraction comes with the cost of some flexibility.
With AWS ECS we can define tasks to represent the components of our system and then create services which maintain a desired count of containers running those tasks. Our production system is now running on ECS and the various components are able to scale to triggers such as queue length, CPU load and request volumes. In future posts I’ll dive into the details of how we’ve set up ECS. We now have created a zero downtime deployment process taking advantage of the features of ECS to start new version of containers, switching the load over when they are ready to handle requests.
Our current Docker based deployment flow looks like this:
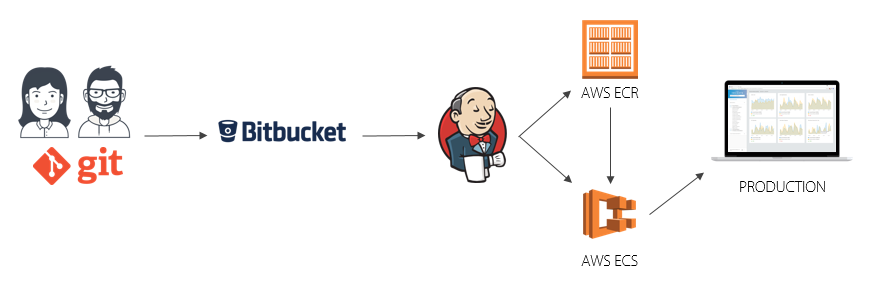
Developers commit into git locally and push to our internally hosted git server. Jenkins picks up on changes to the repository using the GitHub hook and triggers a build. We use a script to define the steps Jenkins will use, the resulting output is a Docker image. Jenkins pushes this image up to our private registry which is running in AWS on their EC2 Container Registry (ECR). Finally, Jenkins triggers an update on the Amazon container service to trigger starting new container instances. Once those instances are successfully started and passing the Application Load Balancer health checks, connections to the prior version of the containers are drained and those containers stopped and removed. We’ll explore the individual elements of this flow in greater depth in later blog posts.
Summary
In this post we have looked at a secondary motivation for using Docker in our latest project. We explored at a high level the deployment flow and looked at some of the practical advantages we can realise by using Docker images through the entire development and deployment lifecycle. We are still refining our approaches as we learn more but we found it fairly simple to get up to speed using Jenkins as a build system, via Docker. In the next set of posts I’ll dive into how we’ve setup that build process, looking at the scripts we use and the optimised images we generate to help improve start up time of containers and reduce the size of the images.
Part 1 – Docker for .NET Developers Introduction
Part 2 – Working with Docker files
Part 3 – Why we started using Docker with ASP.NET Core
Part 4 – Working with docker-compose and multiple ASP.NET Core Microservices
Part 5 – Exploring ASP.NET Runtime Docker Images
Part 6 – This post
Part 7 – Setting up Amazon EC2 Container Registry
Have you enjoyed this post and found it useful? If so, please consider supporting me:
Do you have any input with Docker for ASP.Net running on Windows container with Azure instead of AWS? Am I to assume you used Linux container with AWS instead of a Windows Container? Any input on integration with Visual Studio 2017?
Hi Guy. So far this is all .NET core based and Linux using AWS. I do intend to explore the Windows containers and using the full .NET Framework at some stage. I will also look at the VS 2017 Docker tooling in future posts as well.
Cool look forward to it. In theory it can still be .Net Core and does not need to be .Net Framework. To keep with the theme of Docker for .NET Developers.
I’m trying to wrap my head around how an ASP.NET Core docker image built and published to a registry, can be “promoted” from staging to production using Octopus. The image is immutable, so you can’t “transform” appsettings.json inside of it.
Can you offer any insight on how you do this with Octopus or your build system?
You are correct in that the contents of the image cannot be modified. When starting a container you can pass in environment variables so that gives you a couple of options.
In our case we pass in overrides of some configuration values as environment variables. As we’re using Amazon EC2 Container Services we do this in a task definition file. The default ASP.NET Core configuration hierarchy means that those ENV VARS will take precedence for setting the configuration for the ASP.NET app when it starts up.
You can also control the environment for a container by setting the ASPNETCORE_ENVIRONMENT environment variable which controls the environment that the application is running under. This would allow you to include variable appsettings files such as appsettings.staging.json, appsettings.production.json etc and the values for the current environment will be loaded and take precedence over any base appsettings.json values.
Does that help?
Hi Steve
You mention you’re using the “aspnetcore-build” (which includes all the build tools) for your build pipeline, is that the same version you’re deploying to your production environment?
I would imagine there’s a decent image size difference to the non build version.
Hi Gary,
No we deploy an “optimised” run-time only image to production which is about a quarter of the size of the SDK (build) image. I touch on the differences in https://www.stevejgordon.co.uk/docker-for-dotnet-developers-part-5.
Thanks for the question as you’ve reminded me I need to pick this series up and show our current process to create those optimised images. We now use multi-stage Docker files to do the build in the first stage using the SDK, and then output a final runtime only base image.
Cheers,
Steve