In the first post in the series I introduced a few concepts and key terms you’ll need to know if you want to work with Docker. In this post I will cover the steps needed to begin working with Docker in your development environment. We’ll look at creating a very basic sample API service and a dockerfile that defines an image which can run the application inside a Linux container.
Getting Docker
Before we can begin using Docker we need to install it. There are a couple of options, if like me, you’re developing on Windows.
Docker for Windows
If you’re running Windows 10 Pro, your best option is to download and install Docker for Windows. You can get it from https://docs.docker.com/docker-for-windows/install/#install-docker-for-windows
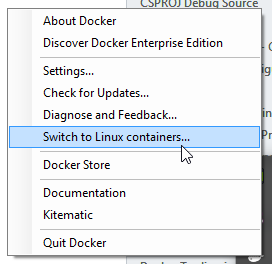
Docker for Windows supports both Windows and Linux containers. To follow along, you’ll need to ensure that Docker is running in Linux mode which is what I’ll be using in my initial examples. To switch between the modes you can right click the Docker tasktray icon…
When running with Linux contains it will start a Linux VM for you inside Hyper-V. Once Docker for Windows is running you can use Powershell to run Docker commands that will be passed through to the Linux host.
Docker Toolbox
If you don’t have Windows 10 Professional, don’t worry, there is another option. Docker also provide Docker Toolbox which includes VirtualBox, a virtualisation product from Oracle which can be installed freely. You can use this on earlier versions of Windows as well as Windows 10 Home.
You can download and install Docker Toolbox from https://docs.docker.com/toolbox/toolbox_install_windows/
Docker Toolbox will create and load a small Linux VM for you inside VirtualBox which will then become the host for Docker. This does add a layer of complexity as you may need to configure port forwarding from the VirtualBox VM host out into your Windows environment. You end up with another layer to manage, but once you’re up and running it’s fairly easy to work with.
Once you have it installed you can run the Docker Quickstart Terminal shortcut to start the Linux VM and attach to it. Once that loads you can run Docker commands on the VM from the bash shell.
Our First Dockerfile
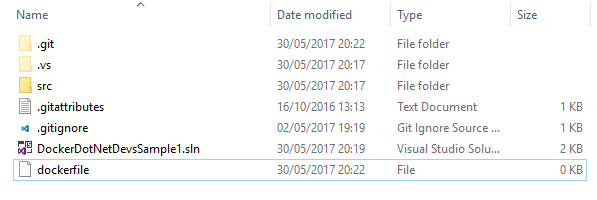
To demo the process of manually creating a dockerfile I’m going to build up a small sample API application. Inside a new empty directory I have created an ASP.NET Core 1.1 API project. This is just a default API project from the Visual Studio templates. I like to structure my solutions in a similar way to the Microsoft repositories so I do move a few things around. In my root folder I have my solution file. I then have a “src” folder, inside which I include any projects that are part of the solution.
With a basic solution in place, I like to create a “docker” solution folder inside Visual Studio and inside that I create a new text file named dockerfile (without an extension). I locate the dockerfile physically in the root of my solution, alongside the sln file.
We can now create our first dockerfile by editing the empty file. I work with it via Visual Studio, but it’s just a plain text file so you can use any editor you like. For now we’re going to create a naïve and quite basic dockerfile to demonstrate some of the main concepts. In later posts I’ll be showing a more optimal way to build and structure our dockerfile(s). The initial dockerfile looks like this:
FROM microsoft/aspnetcore-build:1.1
Docker images are like onions and are layered up from multiple base images. Each new image builds on top of the previous image until a complete image it built, containing all of the components it needs. As a result, every dockerfile you produce will start with a FROM statement, which defines its base image.
In this example I’m using a Microsoft maintained image for aspnetcore called aspnetcore-build. This particular image includes the .NET Core SDK to enable building/publishing the code. I also specify a tag after the colon. All images can be tagged with zero or more tags. This tag specifies that I want the image containing the 1.1 SDK for ASP.NET Core. If I did not include a specific tag, I would get the image tagged with latest, which at the time of writing this is the 1.1.x stream.
These base public images are hosted online at DockerHub. This is a Docker registry that is commonly used for hosting public images. A registry like this can be thought of in similar terms to NuGet for .NET packages. Docker knows to search the DockerHub registry for any images you specify. If you don’t already have a local copy of the image cached locally, it will be pulled from the registry.
WORKDIR /app
The next line sets our working directory inside the container we are building. Any actions we perform will affect that working directory. As each line of the dockerfile is executed, it creates a new intermediate image, building up layers until you have your final image. We’ll look at this in more detail in a future post to see how we can optimise the layering to reduce the number of intermediate images and the time it takes to build a new image.
COPY . .
Next we perform a copy command. When copying you specify the source (on the host) and destination (in the image) of the files to copy. In this case, by using periods we’re copying from the host at the path where the Docker commands are being executed, which will be the root of our solution directory. In the image since we also used a period, we are copying directly into the working directory which in our case is /app.
RUN dotnet restore
RUN dotnet build
Next we execute two run dotnet commands. The first runs the dotnet restore command which will perform a package restore from Nuget for all dependencies of our solution. Next I run a dotnet build command to produce the default application build.
WORKDIR /app/src/DockerDotNetDevsSample1
Next we switch the working directory to the directory containing the copied in project file.
ENTRYPOINT dotnet run
Finally we define the entry point to the image. This is the instruction to the image on how to start the process that it will run for us. In this case we tell it to execute the dotnet run command which will start up the ASP.NET Core API, hosted on Kestrel, and begin listening. By default the base aspnetcore image will set an environment variable that will tell the webhost to listen port 80 within the container.
Building the image
Now that we have a dockerfile defining our image we can use the Docker commands to create the image for us. On Windows when running Docker for Windows we can run the Docker commands directly from a Powershell window. I opened up Powershell and navigated to the root of our sample solution.
From there I run the build command:
docker build -t sample1 .
The inclusion of the -t option allows me to specify a tag for the image which will make working with it easier later on. The dot (period) at the end of the statement is important and tells Docker where to build from. In this case as I’m in the solution root already and my dockerfile is located there I can use a dot to represent the same location.
Docker will now begin to build my image.
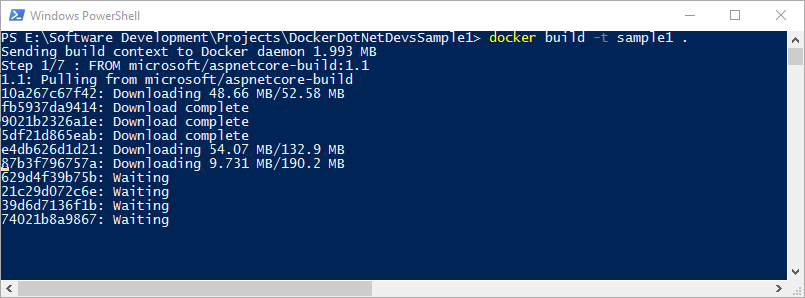
Why is it downloading so much?
As I touched on already, Docker is based on layers of images. Each dockerfile specifies a FROM image which is its base image. It makes a small immutable change which is then available as the basis of the next layer. The aspnetcore-build image is exactly the same. It is based on a dotnetimage from Microsoft and below that a few other layers until we get to the initial Debian Linux image. When we include the aspnetcore image in our FROM command it will pull down the required layers of images from the DockerHub. Each of these is cached on the host machine so they can be quickly reused when possible. Some of these image layers will be very small as they make incremental changes to their base images. In my example I had explicitly cleared all of the images on my machine so I could show this first time download of the images.
Docker Build Output
Here’s the full build output from my sample docker build:
PS E:\Software Development\Projects\DockerDotNetDevsSample1> docker build -t sample1 .
Sending build context to Docker daemon 1.993 MB
Step 1/7 : FROM microsoft/aspnetcore-build:1.1
1.1: Pulling from microsoft/aspnetcore-build
10a267c67f42: Pull complete
fb5937da9414: Pull complete
9021b2326a1e: Pull complete
5df21d865eab: Pull complete
e4db626d1d21: Pull complete
87b3f796757a: Pull complete
629d4f39b75b: Pull complete
21c29d072c6e: Pull complete
39d6d7136f1b: Pull complete
74021b8a9867: Pull complete
Digest: sha256:9251d6953ca2fccfee1968e000c78d90e0ce629821246166b2d353fd884d62bf
Status: Downloaded newer image for microsoft/aspnetcore-build:1.1
---> 3350f0076aca
Step 2/7 : WORKDIR /app
---> 93515c761d80
Removing intermediate container c78aa9397ee7
Step 3/7 : COPY . .
---> 8125a8d08325
Removing intermediate container 6d3db0a39d6a
Step 4/7 : RUN dotnet restore
---> Running in d0d8fa97f402
Restoring packages for /app/src/DockerDotNetDevsSample1/DockerDotNetDevsSample1.csproj...
Restoring packages for /app/src/DockerDotNetDevsSample1/DockerDotNetDevsSample1.csproj...
Installing System.IO.Pipes 4.0.0.
Installing System.Xml.XPath.XmlDocument 4.0.1.
Installing System.Resources.Writer 4.0.0.
Installing System.Runtime.Serialization.Xml 4.1.1.
Installing System.Diagnostics.TraceSource 4.0.0.
Installing Microsoft.NETCore.Jit 1.0.2.
Installing Microsoft.Build 15.1.548.
Installing Microsoft.Build.Tasks.Core 15.1.548.
Installing Microsoft.Build.Utilities.Core 15.1.548.
Installing Microsoft.Build.Framework 15.1.548.
Installing Microsoft.NETCore.Runtime.CoreCLR 1.0.2.
Installing Microsoft.NETCore.DotNetHostPolicy 1.0.1.
Installing Microsoft.Build.Runtime 15.1.548.
Installing Microsoft.NETCore.App 1.0.0.
Installing NuGet.Frameworks 3.5.0.
Installing Microsoft.Extensions.CommandLineUtils 1.0.1.
Installing Microsoft.VisualStudio.Web.CodeGeneration.Tools 1.0.0.
Restore completed in 3.87 sec for /app/src/DockerDotNetDevsSample1/DockerDotNetDevsSample1.csproj.
Installing Microsoft.AspNetCore.Cryptography.Internal 1.1.1.
Installing Microsoft.AspNetCore.DataProtection.Abstractions 1.1.1.
Installing Microsoft.DotNet.PlatformAbstractions 1.1.1.
Installing Microsoft.AspNetCore.Razor 1.1.1.
Installing Microsoft.AspNetCore.DataProtection 1.1.1.
Installing Microsoft.Extensions.DependencyModel 1.1.1.
Installing Microsoft.AspNetCore.ResponseCaching.Abstractions 1.1.1.
Installing Microsoft.AspNetCore.Authorization 1.1.1.
Installing Microsoft.AspNetCore.Mvc.Abstractions 1.1.2.
Installing Microsoft.Extensions.Globalization.CultureInfoCache 1.1.1.
Installing Microsoft.Extensions.Localization.Abstractions 1.1.1.
Installing Microsoft.AspNetCore.Razor.Runtime 1.1.1.
Installing Microsoft.AspNetCore.WebUtilities 1.0.0.
Installing Microsoft.Extensions.ObjectPool 1.0.0.
Installing Microsoft.Net.Http.Headers 1.1.1.
Installing Microsoft.AspNetCore.Antiforgery 1.1.1.
Installing Microsoft.Extensions.Logging.Debug 1.1.1.
Installing Microsoft.AspNetCore 1.1.1.
Installing Microsoft.ApplicationInsights.AspNetCore 2.0.0.
Installing Microsoft.AspNetCore.Mvc 1.1.2.
Installing Microsoft.AspNetCore.Server.Kestrel 1.1.1.
Installing Microsoft.Extensions.Logging.Console 1.1.1.
Installing Microsoft.Extensions.Configuration.EnvironmentVariables 1.1.1.
Installing Microsoft.Extensions.Configuration.Json 1.1.1.
Installing Microsoft.Extensions.Configuration.FileExtensions 1.1.1.
Installing Microsoft.AspNetCore.Routing 1.1.1.
Installing Microsoft.Extensions.WebEncoders 1.1.1.
Installing Microsoft.AspNetCore.Server.IISIntegration 1.1.1.
Installing Microsoft.AspNetCore.Html.Abstractions 1.1.1.
Installing Microsoft.AspNetCore.Hosting 1.1.1.
Installing Microsoft.AspNetCore.JsonPatch 1.1.1.
Installing Microsoft.AspNetCore.Cors 1.1.1.
Installing Microsoft.AspNetCore.Mvc.Core 1.1.2.
Installing Microsoft.AspNetCore.Diagnostics 1.1.1.
Installing Microsoft.Extensions.Options.ConfigurationExtensions 1.1.1.
Installing Microsoft.Extensions.Configuration 1.0.0.
Installing Microsoft.Extensions.DiagnosticAdapter 1.0.0.
Installing Microsoft.ApplicationInsights 2.2.0.
Installing Microsoft.Extensions.Configuration.Json 1.0.0.
Installing Microsoft.AspNetCore.Hosting 1.0.0.
Installing Microsoft.AspNetCore.Mvc.TagHelpers 1.1.2.
Installing Microsoft.AspNetCore.Mvc.Razor 1.1.2.
Installing Microsoft.AspNetCore.Mvc.Localization 1.1.2.
Installing Microsoft.AspNetCore.Mvc.DataAnnotations 1.1.2.
Installing Microsoft.AspNetCore.Mvc.Cors 1.1.2.
Installing Microsoft.AspNetCore.Mvc.Formatters.Json 1.1.2.
Installing Microsoft.AspNetCore.Mvc.ApiExplorer 1.1.2.
Installing Microsoft.AspNetCore.Mvc.ViewFeatures 1.1.2.
Installing Microsoft.Extensions.Configuration 1.1.1.
Installing Microsoft.Extensions.FileProviders.Physical 1.1.0.
Installing Microsoft.Extensions.ObjectPool 1.1.0.
Installing Microsoft.AspNetCore.Routing.Abstractions 1.1.1.
Installing Microsoft.AspNetCore.Http.Extensions 1.1.1.
Installing Microsoft.AspNetCore.Localization 1.1.1.
Installing Microsoft.AspNetCore.HttpOverrides 1.1.1.
Installing Microsoft.AspNetCore.Http 1.1.1.
Installing Microsoft.AspNetCore.WebUtilities 1.1.1.
Installing Microsoft.Extensions.Localization 1.1.1.
Installing Microsoft.AspNetCore.Diagnostics.Abstractions 1.1.1.
Installing Microsoft.Extensions.Configuration.Binder 1.1.1.
Installing Microsoft.Extensions.Configuration.FileExtensions 1.0.0.
Installing Microsoft.Extensions.Configuration.EnvironmentVariables 1.0.0.
Installing Microsoft.Extensions.Options 1.0.0.
Installing Microsoft.Extensions.Logging 1.0.0.
Installing Microsoft.Extensions.DependencyInjection 1.0.0.
Installing Microsoft.AspNetCore.Http 1.0.0.
Installing Microsoft.Extensions.FileSystemGlobbing 1.1.0.
Installing Microsoft.Extensions.FileProviders.Composite 1.1.0.
Installing Microsoft.AspNetCore.Mvc.Razor.Host 1.1.2.
Generating MSBuild file /app/src/DockerDotNetDevsSample1/obj/DockerDotNetDevsSample1.csproj.nuget.g.props.
Writing lock file to disk. Path: /app/src/DockerDotNetDevsSample1/obj/project.assets.json
Restore completed in 5.16 sec for /app/src/DockerDotNetDevsSample1/DockerDotNetDevsSample1.csproj.
NuGet Config files used:
/root/.nuget/NuGet/NuGet.Config
Feeds used:
https://api.nuget.org/v3/index.json
Installed:
86 package(s) to /app/src/DockerDotNetDevsSample1/DockerDotNetDevsSample1.csproj
---> 3ad561c9b58d
Removing intermediate container d0d8fa97f402
Step 5/7 : RUN dotnet build
---> Running in ae5eb32e269f
Microsoft (R) Build Engine version 15.1.1012.6693
Copyright (C) Microsoft Corporation. All rights reserved.
DockerDotNetDevsSample1 -> /app/src/DockerDotNetDevsSample1/bin/Debug/netcoreapp1.1/DockerDotNetDevsSample1.dll
Build succeeded.
0 Warning(s)
0 Error(s)
Time Elapsed 00:00:02.80
---> 87dfa1483f4e
Removing intermediate container ae5eb32e269f
Step 6/7 : WORKDIR /app/src/DockerDotNetDevsSample1
---> de5e09dfdc89
Removing intermediate container 05bf88ae0454
Step 7/7 : ENTRYPOINT dotnet run
---> Running in 5c580412a46a
---> f04465a14c84
Removing intermediate container 5c580412a46a
Successfully built f04465a14c84
SECURITY WARNING: You are building a Docker image from Windows against a non-Windows Docker host. All files and directories added to build context will have '-rwxr-xr-x' permissions. It is recommended to double check and reset permissions for sensitive files and directories.
As you will see, the build process executes each line from our dockerfile in order. At each stage a new intermediate container is built and the change from the next command applied. You can see the output of the package restore occurring for example, and the final build of the dotnet solution.
Running the container
Now that we have an image we can start up one or more containers using that image. A container is a running instance of an image. We can run the image using the following command:
docker run -p 8080:80 sample1
This tells Docker to run the image called sample1. Because we tagged our image with that name it’s easy for us to now start a container instance. Without a tag we would have had to use part of the randomly generated id instead. I also include a -p option which tells Docker that we want to expose a port from the running container through to the host. We define the port on the host that we want to use, and the port on the container we want to pass through. By default no ports are exposed which helps make containers secure.
Here is the output we see when running the above command:
PS E:\Software Development\Projects\DockerDotNetDevsSample1> docker run -p 8080:80 sample1
Hosting environment: Production
Content root path: /app/src/DockerDotNetDevsSample1
Now listening on: http://+:80
Application started. Press Ctrl+C to shut down.
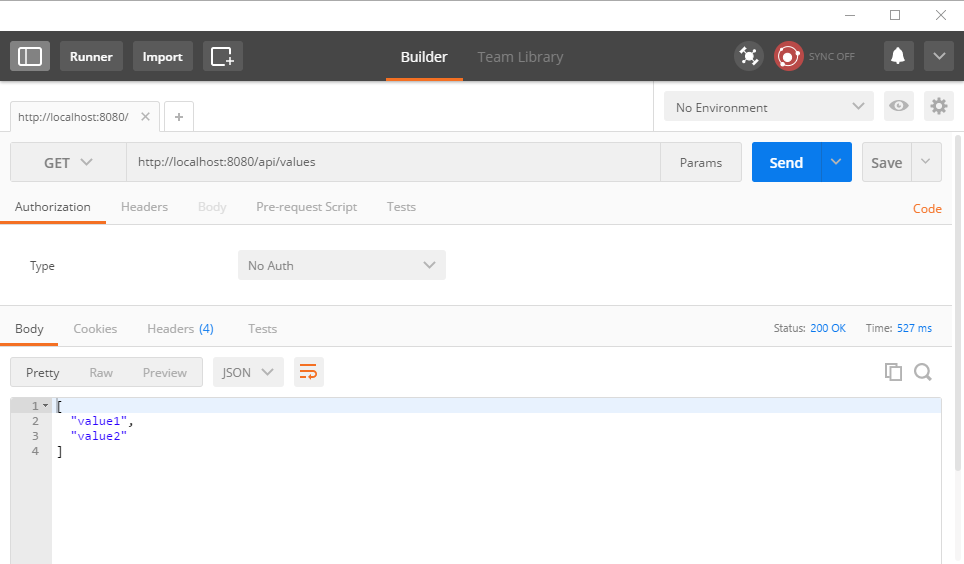
Now that the container is running and a port has been mapped onto the host we can call the API. To test this I used Postman to build a request to send to the API, exposed to us on port 8080.
The above command starts our container from our sample1 image, but as you will have noticed, we were joined to its terminal, so we saw it’s console output. That happens by default since Docker run will attach to the container we are starting. This is fine for testing, but often we are not concerned with spitting out the console to our host.
A more common option is to start containers in detached mode:
docker run -d -p 8080:80 sample1
The -d option tells Docker that we want to start the container in detached mode. This means we won’t see the console output streamed from the container. It’s running, but in the background.
PS E:\Software Development\Projects\DockerDotNetDevsSample1> docker run -d -p 8080:80 sample1
c6e3335de246843b4c77ae0f73e61a2db912fc542669601323db22990b029e7a
We get shown the id for the container which we can then use to perform commands against it. For example, should we want to check what’s happening inside the container we can use the logs command to show the latest console messages.
PS E:\Software Development\Projects\DockerDotNetDevsSample1> docker logs c6
Hosting environment: Production
Content root path: /app/src/DockerDotNetDevsSample1
Now listening on: http://+:80
Application started. Press Ctrl+C to shut down.
PS E:\Software Development\Projects\DockerDotNetDevsSample1>
When sending commands we can use a shortened id to target a container. You only need to send the smallest amount of characters needed to uniquely identify the container. As nothing else is running with an id of c6 we can shorten the id significantly.
To stop the container we can use the command “docker stop c6” which will instruct it to gracefully end the process and stop.
Summary
In this post we’ve looked at the options to install and run Docker on a Windows device. We then looked at creating a basic solution and including a dockerfile so that we could define a Docker image intended to run our application. Finally we looked at how we can start a container from the image and some common commands to work with it. In future posts I’ll expand on this further and show how we’re using docker-compose to orchestrate multiple containers during development. We’ll then look at how we can create a CI build pipeline using Jenkins and eventually look at using AWS ECS to host live services running in containers.
If you want to try out the code above for yourself I have uploaded the source from this post to GitHub.
Other Posts In This Series
Part 1 – Docker for .NET Developers Introduction
Part 2 – This Post
Part 3 – Why we started using Docker with ASP.NET Core
Part 4 – Working with docker-compose and multiple ASP.NET Core microservices
Part 5 – Exploring ASP.NET Runtime Docker Images
Part 6 – Using Docker for Build and Continuous Deployment
Part 7 – Setting up Amazon EC2 Container Registry
Have you enjoyed this post and found it useful? If so, please consider supporting me:
Enjoying this series – thanks! I’ve done the demos and gotten a basic hello world asp.net-on-linux-container running. One thing I’m hoping you’ll cover is getting from that to production on-premise correctly. I’m a .NET dev, but need to know enough about the ops side of this stuff to recommend what is needed for a “real world” on premise docker environment.
In the organization where I tested this, someone else set up the docker host. I was able to publish the docker container to the host without putting in any credentials (that I know of). It ran, but it “feels” like anybody with network access could publish a container to the host. Is this the way it’s supposed to work or is there some way to lock down the docker host? Related, where do things like Mesosphere come into play?
Thanks Daniel. Good to hear that you got a sample going.
I’ll certainly be covering taking this through to hosting the containers on AWS and looking at what I learned along the way. As part of that I’ll look at our build process using Jenkins as well. Some of those concepts will apply on premise as well. I haven’t any direct experience (yet) or running an on premise orchestration / container hosting solution. I do intend to try and look into those options and after that I might be in a position to blog about them. I’m keen to look into Docker Swarm first to see what it offers out of the box. I also want to compare Azure options for running containers as well. In the long run I’d like to cover all possibilities. In the next post I’ll be looking at docker-compose and how Docker began to enable improvements for our dev and test workflow.
Great article! I’m looking forward to the next blog posts.
Thanks. I’m very pleased you’re enjoying them.
Thanks, nice post! As a. NET dev i messed around with Docker a year ago on my windows machine but found the whole experience quite a hassle.
Happy to see you explaining it so well.
Thanks Marc.
You’re welcome.
Steve
Awesome post.
I’m on a mac and managed to get my ASP.NET Core 2.0 Preview Web API running in a container.
I suggest you talk about deleting images, stopping containers, diagnostic logging an so on.
Can’t wait the next post.
Thanks for that.
Thanks Oliver.
I’m glad it proved easy to follow and helpful. Next post is in the works and the outlines of a few more are also pencilled in. Thanks for the feedback. I’ll be trying to work in the useful Docker commands into the posts as they make most sense. I was unsure initially since there is a lot of materials about the commands, but your comment has convinced me there might be value in including them in my series as well.
Cheers,
Steve
Great post!
But I am not able to access from my host browser.I followed all steps and also run inspect command to verify IP but still not working,Any help?
Hi Atul,
What OS are you on and are you using Docker Toolbox or Docker for Windows/Mac? I’ve seen this a few times with the legacy Docker Toolbox, where the port needed to be setup on the VM networking.
Steve
Hi
I am using Windows 10 and Docker for Windows(Version 17.06.0-ce-win18 (12627)).
Did you pull the sample from GitHub or copy things from the post? What do you get from the browser? When running without the -d, do you see the app starting up correctly?
Yes,Its working fine on container IP Address.It means port mapping is not working.